When it comes to maintaining your Holden Trax, understanding the critical components of your vehicle’s cooling system is essential. One such component is the Holden Trax Coolant Reservoir, which is critical in regulating engine temperature and ensuring smooth operation. In this guide, we’ll explore the workings of the coolant reservoir, how to identify potential issues, and how to maintain it for optimal performance. A well-functioning coolant reservoir ensures the engine remains at the right temperature, preventing overheating and possible damage.
What is a Coolant Reservoir?
A coolant reservoir, also known as an overflow or expansion tank, is a crucial component of a vehicle’s cooling system. It is a plastic container near the engine designed to hold excess coolant fluid. This reservoir ensures that the engine’s cooling system remains at the proper coolant level, even when the engine heats up and the fluid expands.
Function of the Coolant Reservoir
The primary function of the coolant reservoir is to store the extra coolant that gets pushed out of the radiator when the engine heats up. The coolant circulates through the engine block as the engine runs, absorbing heat. This causes the coolant to expand, and the excess liquid flows into the reservoir. Once the engine cools down, the coolant is drawn back from the reservoir into the radiator, ensuring a consistent level of coolant in the system.
Importance of a Properly Working Coolant Reservoir
A properly functioning coolant reservoir is essential for maintaining the proper engine temperature. The engine may overheat if the coolant level is too low, leading to severe damage. Conversely, a coolant leak can cause the engine to run hotter than usual, risking overheating. Regularly checking the coolant level and inspecting the reservoir for cracks or leaks can prevent costly repairs and ensure the engine’s longevity.
In summary, the coolant reservoir is a vital part of the vehicle’s cooling system, helping to manage coolant levels and maintain optimal engine performance.
How Does the Coolant Reservoir Work?
The coolant reservoir, also known as the overflow tank or expansion tank, is an essential part of the cooling system in most modern vehicles. It plays a crucial role in maintaining the engine’s temperature and ensuring efficient cooling.
Role in the Cooling System
The primary function of the coolant reservoir is to store excess coolant when the engine is running. As the engine operates, the coolant heats up and expands. Instead of letting the expanded coolant spill out, the cooling system directs it into the reservoir, preventing leaks and maintaining the proper coolant levels. When the engine cools down, the coolant contracts, creating a vacuum that draws the coolant back from the reservoir into the radiator. This process keeps the radiator full and maintains proper pressure in the system.
Pressure Management
Most coolant reservoirs are pressurized, which helps control the coolant’s boiling point, especially in high-temperature situations. This prevents the coolant from boiling over and ensures it can efficiently absorb heat from the engine.
Coolant Level Indicator
The reservoir also provides an easy way to monitor the coolant level. It is typically transparent and has markings that indicate the “min” and “max” levels. This allows drivers to check the coolant level without opening the radiator, which could be dangerous when the engine is hot.
In summary, the coolant reservoir optimises the cooling system by storing and managing coolant overflow, pressure, and temperature control.
Signs of a Faulty Coolant Reservoir
A coolant reservoir, an overflow tank, is crucial in managing the engine’s cooling system. It stores excess coolant, ensuring the engine stays at an optimal temperature. The reservoir malfunctions can lead to engine overheating and other complications. Here are some common signs of a faulty coolant reservoir:
1. Coolant Leaks
One of the most obvious signs is a visible coolant leak around the reservoir or under the vehicle. Cracks or damage to the reservoir can cause coolant to escape, leading to a drop in coolant levels. If you notice puddles of coolant (usually green, yellow, or pink) under your car, it could indicate a leak from the reservoir.
2. Overheating Engine
A malfunctioning reservoir can prevent proper coolant circulation, causing the engine to overheat. If your temperature gauge frequently rises above average, this could indicate that the coolant is not flowing as it should, potentially due to a damaged reservoir or connected hoses.
3. Low Coolant Levels
Even without visible leaks, if the coolant level is consistently low, it might be due to a crack in the reservoir allowing coolant to escape. Monitoring your coolant levels regularly and noticing a drop without apparent reason could point to a problem with the reservoir.
4. Coolant Contamination
If the coolant in the reservoir appears rusty, cloudy or has particles floating in it, this could mean that the reservoir is not sealing correctly, allowing contaminants to enter the system. This can impact the coolant’s effectiveness and lead to more significant engine issues.
5. Steam from the Engine
Bay Seeing steam coming from under the hood is a severe sign. It usually indicates that the engine is overheating and the coolant is either leaking or not circulating correctly. A damaged reservoir might be the cause, as it can prevent proper coolant flow.
Troubleshooting the Holden Trax Coolant Leak Issues
Coolant leaks in the Holden Trax can cause serious engine problems if not addressed promptly. Identifying the source of the leak is the first step to ensure the engine remains calm and efficient. Common symptoms of a coolant leak include visible puddles under the vehicle, a sweet smell, engine overheating, or the coolant warning light on the dashboard. Diagnosing and fixing these leaks early can prevent costly repairs.
Common Causes of Coolant Leaks
A damaged or worn radiator hose is one of the most frequent causes of coolant leaks in the Holden Trax. Over time, hoses can crack or become brittle, leading to leaks. Another potential source is the water pump, which circulates coolant through the engine. If the pump seals wear out or the pump itself is faulty, it can result in leaks. Additionally, issues with the radiator, such as corrosion or physical damage, can cause coolant to seep.
Steps to Diagnose the Leak
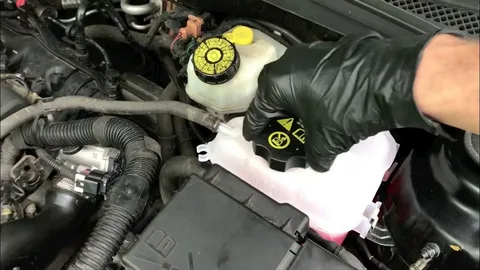
Begin by checking the coolant level and inspecting the radiator hoses for any signs of wear or cracks. Examining the radiator cap is essential, as a faulty cap may cause coolant to escape under pressure. Next, inspect the water pump area for any signs of moisture or coolant traces, which may indicate a failing pump. Another area to check is the coolant reservoir; ensure no cracks or leaks at the seams.
Fixing the Issue
Depending on the cause, repairing a Holden Trax Coolant Leak can vary. Replacing worn hoses or a faulty radiator cap is usually straightforward. However, if the leak stems from the water pump or radiator, it may require more extensive repairs. Regularly maintaining the cooling system and checking coolant levels can help prevent leaks and keep the Holden Trax running smoothly.
Replacing a Coolant Reservoir
Replacing a coolant reservoir is an essential maintenance task that can help prevent engine overheating and ensure your vehicle operates smoothly. The coolant reservoir stores excess coolant when the engine heats up and provides it back to the system when it cools down. Over time, the reservoir can develop cracks or leaks, necessitating a replacement. Here’s a step-by-step guide to help you through the process.
Step 1: Preparation
Before starting, make sure the engine is completely cool. Opening the coolant system when the engine is hot can be dangerous, as it may cause hot coolant to spray out. Gather all the necessary tools, such as a socket wrench, pliers, and a new coolant reservoir. Also, ensure you have a fresh supply of coolant that matches your vehicle’s specifications.
Step 2: Drain the Coolant
Locate the coolant reservoir and open the cap to release any pressure. Next, find the drain valve at the bottom of the radiator and place a container underneath to catch the coolant. Open the valve and let the coolant drain out. This step ensures that no coolant spills when you disconnect the reservoir.
Step 3: Remove the Old Reservoir
With the coolant drained, disconnect the hoses attached to the reservoir. Some vehicles may have clamps that need to be loosened with pliers. Carefully remove the bolts or screws securing the reservoir in place using a socket wrench. Lift the old reservoir out and dispose of it properly.
Step 4: Install the New Reservoir
Position the new coolant reservoir in place and secure it with bolts or screws. Reconnect the hoses, ensuring they are tightly attached and secured with clamps if needed. Once everything is connected, fill the reservoir with fresh coolant. Check the coolant level and top it off if necessary.
Step 5: Test the System
After installing the new reservoir, start the engine and let it run for a few minutes. Check for any leaks and monitor the coolant level. If everything looks good, your replacement is complete.
Maintenance Tips for Your Coolant Reservoir
Proper maintenance of your coolant reservoir is crucial for the efficient functioning of your vehicle’s cooling system. Here are some essential tips to keep it in top condition:
1. Regular Inspection
Check the coolant reservoir level frequently, especially before long drives. Ensure the coolant level is between the “min” and “max” markings. A drop in coolant level could indicate a leak or other issues in the cooling system that should be investigated promptly.
2. Use the Right Coolant
Always use the type of coolant recommended by your vehicle’s manufacturer. Mixing different types of coolant can lead to chemical reactions that may damage the cooling system. Ensure the coolant is at the correct dilution ratio, typically a 50/50 mix of coolant and water.
3. Check for Leaks
Inspect the reservoir and its hoses for any signs of cracks, leaks, or deterioration. Coolant leaks can cause overheating and lead to significant engine damage. Replace any damaged parts immediately to prevent further issues.
4. Flush and Replace Coolant Periodically
Over time, coolant can become contaminated, reducing its effectiveness. Follow the manufacturer’s guidelines for how often to flush and replace the coolant. This helps maintain the cooling system’s efficiency and extends the life of engine components.
Conclusion
Regular checks and maintenance of the Holden Trax Coolant Reservoir can help avert significant engine problems and costly repairs. By monitoring coolant levels and inspecting the reservoir for signs of damage, you can ensure that your cooling system functions efficiently. Addressing issues like coolant leaks or a faulty reservoir promptly can prevent engine overheating and extend the life of your vehicle. Additionally, using the manufacturer-recommended coolant and following the scheduled maintenance guidelines are crucial for optimal performance.
FAQS
Q1: How often should I check the coolant level in my Holden Trax?
A: Check the coolant level at least once a month or before embarking on long trips to ensure it stays within the recommended range.
Q2: Can I use any coolant for my Holden Trax?
A: No. Always use the manufacturer-recommended coolant to avoid potential chemical reactions that could harm the engine and the cooling system.
Q3: Is driving with a cracked Holden Trax Coolant Reservoir safe?
A: Driving with a cracked Holden Trax Coolant Reservoir is risky as it can lead to engine overheating and potential damage. Address the issue immediately to avoid further complications.
| Related Business Listings |
| Contact Directory |
| Local Business Profiles |