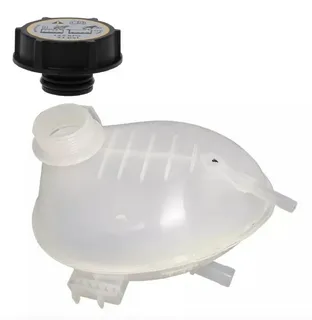
Managing your vehicle’s Radiator Overflow Container is crucial for ensuring your engine runs smoothly and prevents overheating, which can lead to costly damage. The Radiator Over-flow Container, also known as the coolant reservoir or expansion tank, plays a vital role in maintaining proper coolant levels. This blog will guide you through efficiently managing your Radiator Over-flow Container with easy-to-follow steps, from understanding its function to troubleshooting common issues.
Understanding the Radiator Over-flow Container
The Radiator Over-flow Container, or coolant reservoir, plays a critical role in maintaining your car’s cooling system and preventing engine overheating. This reservoir stores the excess coolant that expands from the radiator when the engine reaches high temperatures. As the engine runs and heats up, the coolant within the radiator expands and needs a place to go, which is where the overflow container comes in. By storing this expanded coolant, the reservoir helps manage the pressure within the cooling system and ensures the radiator remains adequately filled.
Coolant is essential to keeping the engine at an optimal operating temperature. It circulates through the engine and absorbs heat generated during combustion. Without an adequate level of coolant, the engine could overheat, potentially causing serious damage to components like the head gasket, cylinder heads, and even the engine block itself. The overflow container safeguards against such overheating.
Proper maintenance of the overflow container is essential to the overall performance and health of the cooling system. Regularly inspecting the container for cleanliness and ensuring it’s at the correct fill level helps prevent issues like coolant leaks and airlocks, which can compromise the cooling system. A dirty or damaged overflow container can lead to blockages or cracks, potentially resulting in coolant loss. Leaks can lead to air pockets, which may disrupt the smooth flow of coolant and cause the engine to overheat.
Tools and Materials Needed
You will need a few tools and materials to manage your Radiator Over-flow Container effectively. These items will help you inspect, refill, and maintain your radiator coolant system:
– Funnel: To prevent spilling when adding coolant.
– Coolant: The right type for your vehicle. Be sure to check the owner’s manual.
– Gloves: To protect your hands from hot surfaces and chemicals.
– Clean Rags: To wipe up spills and clean system parts.
– Flashlight: This inspects hidden or dark areas around the Radiator Over-flow Container.
– Pressure Test Kit: If you’re diagnosing leaks or issues with the system.
– Coolant Flush Kit: This is for cleaning and flushing the entire cooling system (optional).
– Pliers: Remove clamps if needed.
– Screwdriver: This is for removing any covers or panels obstructing access to the overflow container.
Safety Precautions
Before you begin working on your vehicle’s Radiator Over-flow Container, it is essential to follow these safety precautions:
1. Allow the Engine to Cool: Never open the Radiator Over-flow Container while the engine is hot. Hot coolant under pressure can cause serious burns. Wait until the engine is cool before performing any maintenance.
2. Wear Protective Gear: Use gloves to protect your hands from hot surfaces and potential contact with harmful coolant fluids. Safety glasses are also recommended when working in tight spaces or with pressurized systems.
3. Work in a Well-Ventilated Area: If you’re working inside a garage, ensure adequate ventilation to avoid inhaling harmful fumes.
4. Dispose of Coolant Properly: Coolant is toxic to animals and humans, so dispose of any waste coolant according to local environmental regulations.
Locating the Radiator Expansion Bottle
Finding the Radiator Expansion Bottle (the coolant reservoir) is your first step. Most vehicles have a coolant reservoir near the radiator, either in the front of the engine bay or along the side. Look for a translucent plastic tank with markings indicating the minimum and maximum coolant levels.
If you’re having trouble locating the overflow container, consult your vehicle’s manual. Some models may have additional covers or panels that must be removed before you can access the expansion bottle.
Checking Coolant Levels
Once you have located the Radiator Over-flow Container, the next step is to check the coolant level. A properly functioning system should have a coolant level between minimum and maximum markings.
– Cold Engine: It’s always best to check coolant levels when the engine is cold, as this gives a more accurate reading. Coolant levels naturally rise when the engine heats up, making the levels appear higher than usual if checked immediately after running the vehicle.
– Checking for Proper Coolant Level: With the engine off and relaxed, use the markings on the side of the container to determine if the coolant level is within the ideal range.
Adding Coolant to the Radiator Over-flow Container
If the coolant level is low, add coolant to the overflow container. Here’s how to do it safely:
1. Select the Right Coolant: Refer to your vehicle’s owner’s manual to choose the correct coolant. Some cars require a specific type of coolant, and mixing different coolants can lead to damage.
2. Remove the Cap: Slowly open the coolant reservoir cap. Be cautious, as the engine may have residual heat even after cooling, which could cause the system to release some pressure.
3. Add Coolant: Pour the recommended amount of coolant into the overflow container using a funnel. Avoid overfilling. You want the level to reach just below the maximum line.
Inspecting for Leaks and Damages in the Radiator Coolant Overflow Tank
Leaks and Radiator Coolant Overflow Tank damage can significantly impact your vehicle’s cooling system, often leading to coolant loss, overheating, and potential engine damage. Regular inspections of these components help detect issues early, enabling timely repairs that prevent further complications. Here are some essential areas to examine:
Check for Cracks or Discoloration
Start by inspecting the overflow container itself. Over time, the plastic material of the overflow tank may degrade due to heat and pressure fluctuations, leading to cracks or discolouration. Minor fractures often go unnoticed but may slowly leak coolant, gradually reducing the coolant level and compromising the engine’s cooling capacity. Look for cracks, warping, or colour changes indicating material weakness or damage.
Inspect Hoses and Connections
Next, examine the hoses attached to the overflow tank and radiator. These hoses carry coolant to and from the radiator, and they endure constant exposure to hot coolant and engine vibrations, which can wear them down over time. Look closely for leaks around the hose connections and check for loose or worn-out clamps securing the hoses. A simple tightening of the clamps or replacing damaged hoses can prevent leaks.
Examine the Radiator Cap
The radiator cap is critical in maintaining the proper pressure within the cooling system. A faulty or improperly sealed radiator cap can lead to coolant leaks, inadequate pressure, and even air entering the system, all of which can disrupt the coolant flow. Inspect the radiator cap for any signs of wear, such as a damaged seal or corrosion around the edges. If the cap isn’t sealing correctly, replacing it with one that meets the vehicle’s specifications is advisable.
Ensuring Optimal Coolant Mixture Levels
Coolant usually comes mixed with water, but some vehicles require a 50/50 mix of coolant and distilled water. A properly mixed coolant prevents corrosion, overheating, and freezing. To ensure that your coolant mixture is correct:
1. Check the Manufacturer’s Recommendation: Refer to your vehicle’s manual to determine the correct coolant mixture.
2. Use a Coolant Hydrometer: A coolant hydrometer or antifreeze tester can test the strength of the coolant mixture. This ensures that your coolant will perform well at all temperatures.
Cleaning and Maintenance Tips
Keeping the Radiator Over-flow Container clean is essential for preserving its function and supporting the overall health of your vehicle’s cooling system. Contaminants, such as dirt, rust particles, or residue from old coolant, can build up over time and interfere with coolant flow, reducing cooling efficiency and potentially leading to overheating. Here’s a more detailed look at how to care for your Radiator Over-flow Container and cooling system:
– Clean the Overflow Container: To maintain a clean overflow container, periodically rinse it to remove any dirt, residue, or contaminants that may have accumulated. Begin by ensuring the engine is cool to avoid burns. Carefully remove the container if it’s detachable or fixed; you can use a long-handled brush to scrub the inside gently. Mix mild soap with warm water and pour it into the container. Shake or stir the solution within the tank to dislodge any grime.
– Flush the Radiator: Flushing the radiator and cooling system on a scheduled basis is essential to remove any old, degraded coolant and prevent deposits from accumulating within the system. Over time, coolant can break down, leaving mineral deposits or corrosion that hinder efficient heat exchange. By flushing the radiator every 30,000 to 50,000 miles—or according to your vehicle manufacturer’s recommendations—you can clear these deposits and ensure fresh coolant circulates within the engine.
– Regular Inspections: As part of your regular vehicle maintenance routine, inspect the Radiator Over-flow Container and related cooling system components, such as hoses, clamps, and the radiator cap. Look for cracks, discolouration, or wear and tear in the overflow tank. Check the hoses for cracks, leaks, or loose connections, and examine the radiator cap for signs of corrosion or improper sealing.
Common Issues and Troubleshooting Tips on Radiator Coolant Expansion Tank
Over time, the Radiator Coolant Expansion Tank and its associated components may experience problems. Some common issues include:
– Coolant Leaks can occur in the radiator, hoses, or overflow container. If you notice any coolant puddles under your vehicle, inspect the system for signs of leaks.
– Engine Overheating: If your engine is running hot, it could indicate low coolant levels or a failure in the cooling system. In such cases, check the overflow tank for the proper coolant level.
– Dirty Coolant: If the coolant appears brown or dirty, it may be a sign of contamination. Flush the system and replace the coolant as necessary.
– Radiator Cap Malfunction: If the radiator cap is faulty, it can cause excessive pressure or allow coolant to escape. Replacing a damaged cap is often a simple fix.
Conclusion
Properly managing your radiator overflow container is a simple but essential task that keeps your vehicle’s engine running smoothly. Regular inspections, maintaining the proper coolant levels, and addressing any leaks or damage can extend the life of your engine and prevent costly overheating problems. With the right tools, materials, and safety precautions, you can ensure your radiator system is in optimal condition.
FAQs
How often should I check my Radiator Overflow Container?
It’s best to check the coolant levels in the overflow container every few weeks or during regular maintenance intervals.
Can I use any coolant for my car?
No, you must use the coolant recommended by your vehicle manufacturer. Using the wrong type of coolant can cause damage to your engine.
How do I know if my Radiator Over-flow Container is leaking?
Check for coolant puddles under your car, and inspect the container for cracks or any signs of coolant stains around the hose connections.
What should I do if my engine overheats?
First, check the coolant levels in the overflow container. If they are low, top them up. If the problem persists, inspect the system for leaks or damage and consult a professional mechanic.
Can I drive with a cracked Radiator Over-flow Container?
It’s not advisable. A cracked container can lead to coolant leaks, which can cause engine overheating. It’s best to have it replaced as soon as possible.
| Related Business Listings |
| Contact Directory |
| Local Business Profiles |


