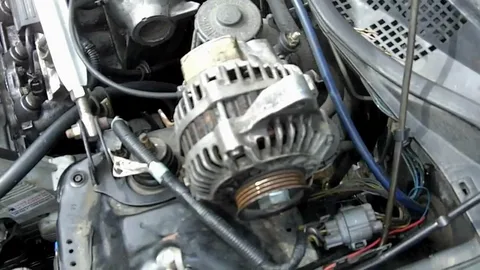
The 2009 CRV alternator is essential for ensuring the vehicle’s electrical system functions effectively. Its primary role is to convert mechanical energy into electrical energy, which is crucial for charging the battery and powering various components such as headlights and the infotainment system. The alternator is critical to the vehicle’s performance, supporting numerous electronic functions that modern drivers rely on daily. Understanding the alternator’s function and recognising the importance of its upkeep can significantly impact the longevity and reliability of the 2009 CRV. Regular checks and maintenance can help detect early signs of alternator issues, preventing more severe problems.
Features of the Honda CRV Alternator
The Honda CRV alternator is engineered to meet the vehicle’s high performance and reliability standards. It typically provides an output of 100-130 amps, sufficient to power all of the car’s electrical components, including the battery, headlights, and infotainment system.
The alternator is built with high-quality materials, ensuring it can withstand the stresses of daily driving. Its compact design allows it to fit neatly within the engine bay, contributing to the overall efficiency and reliability of the vehicle. The alternator’s efficiency is enhanced by its robust construction, making it capable of enduring various driving conditions and maintaining consistent performance.
Common Issues with the 2009 Honda CRV Alternator
Despite its durable construction, the 2009 Honda CRV alternator can encounter several challenges. Recognizing these issues early is key to maintaining vehicle reliability and avoiding further complications.
Dimming or Flickering Headlights
One common problem is dimming or flickering headlights. This usually indicates that the alternator is struggling to supply adequate power, which can affect overall vehicle performance, especially at night.
Consistently Dead Battery
A failing alternator often leads to a dead battery. If the alternator cannot charge the battery effectively, the vehicle may struggle to start or lose power unexpectedly, necessitating immediate attention.
Unusual Noises from the Engine Area
Grinding or whining noises from the engine compartment can point to worn-out bearings within the alternator. These sounds indicate internal damage and should be addressed promptly to prevent further issues.
Faulty Diodes and Irregular Charging
Faulty diodes within the alternator can cause irregular charging or complete failure, which may result in erratic electrical performance. If these symptoms appear, inspecting and repairing the alternator is essential.
Slipping Drive Belt
A slipping drive belt can reduce the alternator’s efficiency by impacting its ability to generate power. Ensuring the belt is tensioned correctly and well-conditioned can prevent this issue.
Steps for Diagnosing Alternator Problems
Diagnosing alternator problems in the Honda CRV 2009 model requires a methodical approach. Start by visually inspecting the alternator and surrounding components. Look for loose connections, damaged wires, and any signs of corrosion around the terminals. These visual clues can often indicate underlying issues.
Next, employ a multimeter to measure the alternator’s voltage output. Connect the multimeter to the battery terminals and start the engine. A healthy alternator typically produces a voltage between 13.5 and 14.5 volts. If the reading falls below 13 volts, the alternator may not charge the battery correctly.
Professional Diagnostic Tools
Listen for any unusual noises from the engine area, such as grinding or whining. These noises can signal worn-out bearings or other internal issues within the alternator. Check the drive belt for signs of wear or looseness, which can affect the alternator’s performance. A slipping or damaged belt can lead to insufficient power generation.
Examine the alternator’s diodes, as faulty diodes can cause irregular charging patterns. This step might require professional diagnostic tools, so consulting a mechanic could be beneficial. Using these diagnostic steps, owners can identify potential alternator issues early and take appropriate measures to rectify them.
Tools Needed for 2009 Honda Crv Alternator Replacement
A smooth 2009 Honda crv alternator replacement begins with assembling a comprehensive toolkit. A ratchet set with multiple socket sizes is critical for handling various bolt sizes securely and efficiently.
Importance of Screwdrivers and Pliers
Both flathead and Phillips screwdrivers are necessary to remove smaller components and panels. Pliers are indispensable for managing clips, wires, and electrical connectors during the process.
Managing the Serpentine Belt
A spanner set is crucial for handling the serpentine belt tensioner. Proper belt handling ensures that the alternator can be removed and replaced without causing additional strain on the engine components.
Testing Electrical Connections
After installation, a multimeter is highly recommended to test the alternator’s electrical connections. This ensures proper charging functionality and prevents potential electrical issues post-replacement.
Safety Gear and Precautions
Safety gear, such as gloves and eye protection, is vital to minimise risks of injury while working in the engine bay. Handling sharp or greasy components necessitates extra caution to avoid accidents.
Importance of a Well-Lit Workspace
A well-lit workspace is essential for precision. A portable lamp or head torch helps illuminate hard-to-reach areas under the bonnet, ensuring all tasks are carried out accurately and efficiently.
Procedure for Replacing the Honda CRV Alternator
Replacing the alternator in the 2009 Honda CRV involves a systematic approach to ensure safety and efficiency. Initially, disconnect the battery to eliminate any risk of electrical shock. Using a spanner, relieve the tension on the serpentine belt and carefully remove it from the pulleys. Next, unbolt the old alternator and disconnect the attached electrical wiring. Labelling or taking a photo of the connections is advisable to ensure proper reattachment later.
Once the old alternator is free, position the new alternator in its place and secure it with bolts. Reattach the electrical connections, ensuring each wire is firmly in place. Replace the serpentine belt, ensuring it is correctly aligned on all pulleys and that the tension is appropriately adjusted.
Double-Checking All Connections: Honda Crv 2009 Alternator
After securing the new alternator and double-checking all connections, reconnect the battery. Start the engine and use a multimeter to test the Honda crv 2009 alternator output voltage, confirming it falls within the 13.5 to 14.5-volt range. Listen for any unusual noises that might indicate improper installation or internal issues.
It is also beneficial to inspect the area around the alternator and the serpentine belt for any additional signs of wear or potential problems that could affect the alternator’s performance. By following these steps carefully, the replacement process can be completed effectively, ensuring the vehicle’s electrical system remains functional and reliable.
Cost Considerations for Alternator Replacement
Replacing the alternator in a 2009 Honda CRV involves various costs that can fluctuate based on several factors. The price of a new alternator typically ranges, contingent upon the brand and retailer. Labour costs are an additional consideration for those opting to hire a professional mechanic. This cost covers the expertise and time required to ensure the alternator is installed correctly and safely.
Choosing a professional service can provide peace of mind, particularly for individuals who may not possess the necessary mechanical skills or tools. However, a DIY approach can be a more economical option for those with a knack for automotive repairs. In such cases, purchasing the alternator and performing the replacement independently can significantly reduce overall expenses.
Alternator Honda Crv 2009 Optimal Performance
It’s also worth considering the potential cost of ancillary parts that may need replacement during installation. Items such as serpentine belts, tensioners, or additional wiring could add to the total price if they are found to be worn or damaged. These parts are crucial for the alternator’s optimal performance and should not be overlooked during replacement.
Ultimately, the decision between professional installation and DIY replacement hinges on the individual’s confidence and proficiency in handling automotive repairs and their budget for the project. Proper planning and understanding of all potential costs can ensure a smoother replacement process of an alternator Honda crv 2009, whether done independently or by a professional.
Preventative Maintenance for Prolonging Alternator Life
Regular and proactive maintenance is essential to extending the lifespan of the CRV alternator.
- Begin with routine inspections to check for any signs of wear or damage, focusing mainly on the drive belt and electrical connections.
- Ensuring that the drive belt remains in good condition and adequately tensioned can significantly reduce strain on the alternator.
- Keeping the alternator and its components clean from dirt and debris also helps maintain optimal performance.
- Additionally, avoiding overloading the vehicle’s electrical system with aftermarket accessories that demand excessive power is advisable, as this can overwork the alternator.
- Regularly testing the battery’s health and ensuring it is fully charged will also reduce unnecessary stress on the alternator, promoting its longevity.
Extend The Alternator’s Life
A structured approach to replacing the alternator with the correct tools and procedures ensures the job is completed efficiently and safely. The cost considerations highlight the options available, whether professional services or a DIY method, allowing for informed financial decisions. Regular preventative maintenance, such as checking the drive belt and electrical connections, can extend the alternator’s life, reducing the likelihood of unexpected failures.
By adhering to these guidelines and monitoring the alternator’s condition, owners can ensure their 2009 Honda CRV continues to function optimally and provide reliable and safe transportation.
Conclusion
Regular maintenance and a clear understanding of the 2009 CRV alternator can significantly enhance the vehicle’s performance and reliability. Recognising early signs of alternator issues, such as dimming headlights or unusual noises, allows for timely interventions to prevent more severe problems. The diagnostic steps provided can guide owners in identifying faults effectively, ensuring any necessary repairs or replacements are undertaken promptly.
FAQs
1. How do I know if my 2009 crv alternator needs replacement?
Dimming headlights, a dead battery, or unusual noises like grinding or whining are signs of a failing 2009 crv alternator. If your CR-V struggles to start or the battery warning light appears on the dashboard, it’s time to inspect the alternator.
2. What are the best replacement options for the 2009 CR-V alternator?
You can choose between OEM (Original Equipment Manufacturer) alternators, like Denso, or aftermarket options. OEM parts are reliable and long-lasting, while aftermarket alternators may offer cost savings but could vary in quality. Always check compatibility with your CR-V model.
3. Can I upgrade my 2009 CR-V alternator for better performance?
Upgrading to a high-output alternator can improve performance using power-intensive accessories like audio systems or additional lighting. However, to avoid issues, ensure the upgraded alternator is compatible with your CR-V’s electrical system.
| Related Business Listings |
| Contact Directory |
| Local Business Profiles |