Are you ready to tackle a DIY project that can save you time and money? If you’re experiencing electrical issues or strange noises in your Suzuki Swift, it might be time for an alternator replacement. While the idea of removing an alternator may seem daunting, fear not! With the right tools and some handy tips, you’ll find that this task is more manageable than expected.
Whether you’re a seasoned mechanic or just starting out on your automotive journey, preparing your Suzuki Swift Alternator Removal requires careful planning. From ensuring safety to knowing how to access those tricky components, we’re here to guide you through every step of the process. Grab your toolkit and let’s dive into this essential maintenance task!
Tools and Equipment Required
Before you dive into the Suzuki Swift alternator removal, gathering the right tools is crucial. Having everything on hand will streamline your process and make it more efficient.
Start with basic hand tools like a socket set, ratchet, and wrenches. These will help you loosen and remove various bolts securing the alternator in place. A torque wrench is also helpful for reassembling components to manufacturer specifications.
Don’t forget about screwdrivers! Both flathead and Phillips screwdrivers are essential for tackling any screws that might be holding brackets or covers in position. You may encounter plastic clips as well, so having a trim removal tool can come in handy.
A multimeter could prove invaluable too if you’re troubleshooting electrical issues prior to removal. It allows you to check voltage levels and ensure that your battery isn’t at fault before assuming it’s an alternator problem.
Safety equipment should never be overlooked. Gloves protect your hands from sharp edges while safety glasses shield your eyes from debris during the process. With these tools gathered, you’ll be fully equipped for a smooth Suzuki Swift alternator removal experience.
Ensuring Safety Precautions
When preparing for Suzuki Swift alternator removal, safety should always be a top priority. Start by wearing the appropriate personal protective equipment. This includes gloves and safety glasses to shield your hands and eyes from any debris or sharp edges.
Make sure you are working in a well-ventilated area. A cramped or poorly lit space can lead to accidents, especially when dealing with electrical components. If possible, park your vehicle on a level surface to ensure stability while working.
Before starting any work on the car, it’s essential to disconnect the battery first. This prevents any accidental short circuits that could cause sparks or damage electronic systems in your vehicle. Always remove the negative terminal before tackling any parts of the electrical system.
Keep all tools organized and within reach during the process. Having everything at hand will minimize distractions and help maintain focus while working on your Suzuki Swift’s alternator.
Take regular breaks if you’re feeling fatigued. Working while tired increases risks significantly, so it’s best not to rush through this important task as thoroughness is key for both performance and safety during Suzuki Swift alternator removal.
Disconnecting the Battery
Disconnecting the battery is a crucial step in preparing for Suzuki Swift alternator removal. It ensures safety and prevents any electrical mishaps during your work. Start by locating the battery, which is typically found under the hood on the driver’s side.
Before you begin, make sure to gather your tools, including a wrench or socket set that fits your battery terminals. You’ll need these handy throughout the process.
Always disconnect the negative terminal first—this reduces the risk of short circuits when removing connections. Use your wrench to loosen and remove the nut from this terminal carefully. Once it’s loose, gently lift it off and tuck it away so it doesn’t accidentally come into contact with other metal parts.
Next, proceed to disconnect the positive terminal in a similar manner. Loosen its nut and take off that connection as well; just ensure it’s isolated properly after removal.
Now that both terminals are disconnected, you can feel confident moving forward with other preparations for alternator removal without worrying about accidental electrical discharge or shocks.
Locating the Suzuki Swift Alternator Not Charging
Locating the Suzuki Swift Alternator Not Charging is a straightforward task, but it requires some familiarity with your vehicle. First, open the hood and secure it safely. The engine compartment offers ample space and allows you to get a clear view of various components.
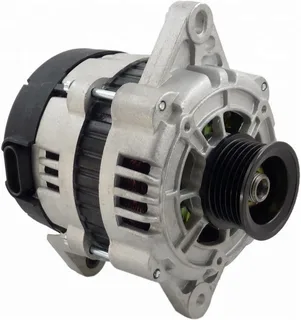
Next, look for the engine block; this is where you’ll find the alternator mounted. Typically, it’s situated on either side of the engine near the top. In most Suzuki Swifts, you’ll spot it on the passenger side.
To help identify it more easily, know that an alternator has several key features: a round body with electrical connections and usually one or two belts attached to its pulley. It’s larger than some other components around it like tensioners or idlers.
If you’re having trouble spotting it, consult your owner’s manual for diagrams that illustrate component placement. This can be particularly useful if you’re new to car maintenance or unfamiliar with Suzuki models.
Once you’ve located the alternator, take note of its position relative to surrounding parts as this will assist in future removal efforts when you proceed with your Suzuki Swift alternator removal process.
Removing Obstructions for Easy Access
When preparing for Suzuki Swift alternator removal, ensuring easy access is crucial. Start by inspecting the engine bay for any components that may obstruct your path. This includes air intake ducting, engine covers, or possibly even hoses.
Carefully remove these parts to clear the area around the alternator. Take your time with this step; rushing might lead to breaking clips or damaging fragile components. A gentle hand will go a long way in preserving these elements for future use.
Make sure you have a small container or bag to keep screws and fasteners organized as you work. Losing hardware can be frustrating and may delay reassembly later on. Keeping everything sorted ensures that you’ll have what you need when it’s time to put everything back together.
Consider utilizing a flashlight if visibility is limited under the hood. Lighting up dark corners makes it easier to spot potential obstructions that could hinder progress during removal.
Double-check that there are no hidden cables or wires tangled near the alternator before proceeding further. Ensuring nothing stands in your way allows for a smoother process as you move forward with removing the alternator from your Suzuki Swift.
Loosening the Belt Tensioner
Importance of Loosening the Belt Tensioner
Loosening the belt tensioner is a vital first step when preparing for the removal of the alternator in a Suzuki Swift. The tensioner ensures that the serpentine belt remains taut, which is crucial for the effective operation of various components, such as the alternator, power steering pump, and air conditioning. Without properly loosening the tensioner, the belt cannot be safely removed, making it an essential process to perform correctly.
Gathering the Necessary Tools
Before attempting to loosen the tensioner, it’s important to gather the necessary tools. The task typically requires a wrench or ratchet that fits the bolt on the tensioner. Having the right size socket is essential to avoid damaging the bolt or surrounding parts. Ensuring you have the correct tools on hand will prevent unnecessary delays and make the job smoother.
Locating the Belt Tensioner
The belt tensioner is generally easy to identify once you’re familiar with its location on the engine. It usually consists of a pulley mounted on an adjustable arm. Depending on the specific engine setup of the Suzuki Swift, the tensioner might be in a slightly different position, but it can be located by following the path of the serpentine belt. This step is critical to understanding how to properly approach the task.
Proper Application of Pressure
Once you’ve located the tensioner, applying pressure is the next key step. Using the wrench or ratchet, attach it to the tensioner’s bolt. Many tensioners have markings that indicate the correct direction in which pressure should be applied to release tension from the belt. By carefully following these markings, you can relieve just enough tension to begin removing the belt without causing damage or strain to the belt or other components.
Checking Electrical Connections
Before you remove the alternator from your Suzuki Swift, checking the electrical connections is essential. These components play a crucial role in ensuring everything runs smoothly. A faulty connection can lead to a host of problems, including poor charging performance.
Start by inspecting the wiring harness attached to the alternator. Look for any signs of wear and tear, such as frayed wires or exposed insulation. Even minor damage could cause significant issues later on. If you notice anything unusual, consider replacing those wires before proceeding with removal.
Next, examine the connectors themselves. Make sure they are securely fastened and free from corrosion or dirt buildup. Corroded connections can impede proper functionality and may complicate your repair process.
As you check these electrical points, it’s also wise to disconnect any additional sensors linked to the alternator if applicable. This step will help prevent accidental damage during removal while ensuring that all related parts remain intact.
Take this opportunity to familiarize yourself with how everything fits together before removing any components. Understanding these connections will make reinstallation much smoother when you’re ready to put everything back in place after swapping out your alternator.
Preparing for Suzuki Swift Wont Start Removal
Before you start the Suzuki Swift Wont Start removal, it’s essential to gather everything you’ll need. Having all your tools and equipment at hand saves time and frustration later. A wrench set, socket set, and a ratchet can help you loosen those stubborn bolts. Don’t forget gloves for protection against sharp edges.
Next, make sure you’ve got good lighting in your workspace. Visibility is crucial when you’re working on tight areas under the hood. Consider using a flashlight or portable work light to illuminate any dark spots. It makes identifying parts easier.
Also, ensure that you have a clean area around your vehicle. A tidy workspace minimizes distractions and decreases the chance of losing small components like nuts or bolts during the process. Keeping organized can be as simple as laying out trays for different sizes of screws.
It’s important to remember that patience is key here; rushing through this step could lead to overlooking critical details or damaging components unintentionally. Take a moment to familiarize yourself with how everything fits together before diving into removal.
Take some time for a quick visual inspection of surrounding components before proceeding with removal steps as planned in previous sections—note any potential issues that might arise once you begin working on the alternator itself.
Conclusion
Preparing your Suzuki Swift for alternator removal can seem daunting at first, but with the right approach and tools, the process becomes manageable. Each step plays a crucial role in ensuring that everything goes smoothly.
Understanding how to disconnect the battery safely is vital. This protects you from electrical shocks and prevents any accidental short circuits during the removal process.
Locating the alternator might require some patience. It’s generally situated near the front of the engine bay, often tucked away among other components. Clearing out space helps make access easier.
Loosening the belt tensioner is another essential step that shouldn’t be overlooked. A properly loosened belt allows for smoother alternator removal without unnecessary strain on surrounding parts.
FAQs
What tools do I need for Suzuk Swift alternator removal?
You’ll require basic hand tools such as a socket set, wrenches, and screwdrivers. Additionally, a belt tensioner tool is handy for loosening the serpentine belt.
How long does it take to remove an alternator from a Suzuki Swift?
The time can vary based on your experience level but generally takes about one to two hours if you’re prepared and organized.
Do I need special skills to remove the alternator?
While some mechanical knowledge is beneficial, most DIY enthusiasts with basic car maintenance skills should be able to tackle this task without professional help.